


Get a list of all your cryptocurrency transactions

Photo by Kelly Sikkema on Unsplash
In the previous article, I showed you how to use the Coinbase API to authenticate your application so that anybody can use it. In this article, I will show you how to build on this by:
- getting user details
- getting a list of all user accounts
- get a list of all transactions (buy, sell, etc) that the user has completed for each crypto coin they own.
Getting User Details
Let’s look at the Coinbase API documentation about showing the current user details. You can view documentation here.
The documentation says we need to make a GET call to the /v2/user endpoint to get current users' public information. To get user's email or private information, use permissions wallet:user:email and wallet:user:read.
In the previous article, we provided a list of permissions that we were requesting from Coinbase when the user authorized our application. In that list we included wallet:user:email and wallet:user:read.

Saving User Token Details
In order to call the /v2/user endpoint we have to include the token we previously received after the user authorized our application. We need to store these values.
Open the index.js file in the routes directory. In the /callback endpoint, the token is in the response variable. At top of the file below all the variables we created add the following two:
let accessToken = ""; let refreshToken = "";
Then below the response variable in the try block set the values for both of the new variables like this:
try {
  const response = await axios(config);
 // saving tokens for other requests
  accessToken = response.data.access_token;
  refreshToken = response.data.refresh_token;
 res.send({ response: response?.data });
}
Create /user endpoint
We will create a new endpoint for /user. Here is the code:
// Gets the user details
router.get("/user", async (req, res) => {
  const config = {
    method: 'get',
    url: 'https://api.coinbase.com/v2/user',
    headers: {
      'Authorization': `Bearer ${accessToken}`,
      'CB-VERSION': '2021-06-23'
    }
  };
 try {
    const response = await axios(config);
    res.send({ response: response?.data })
  } catch (e) {
    console.log("Could not get user", e.response.data)
  }
});
Let’s walk through this code. It has a similar format to the code we put in for the /callback endpoint.
We create a config object that has:
METHODis GETURLis the /v2/user endpointheaders- we includeAuthorizationand set it to the Bearer token we received for the user. This is the token we stored from the /callback endpoint.
We use Axios to call the Coinbase API using this config object. Just like the /callback endpoint we are going to display everything returned from the Coinbase API in the browser.
To test this out, start your server. In a browser navigate to http://localhost:3000. Connect to Coinbase and authorize the application.
Next enter http://localhost:3000/user as the URL in your browser. You should get a response like this:

Getting List of User Account Holdings
Account resource represents all of a user’s accounts, including bitcoin, bitcoin cash, Litecoin and Ethereum wallets, fiat currency accounts, and vaults.
To list all of the user’s accounts, you would access the /v2/accounts endpoint. This endpoint will list current users' accounts to which the authentication method has access.
How do you know what accounts you have access to? Well in the code for the button on the homepage to connect to Coinbase we include a parameter account=all. This gives us access to every account of the user.
Let’s add a new endpoint for /accounts. Add the following code in the index.js file:
// Gets all account details
router.get("/accounts", async (req, res) => {
  const config = {
    method: 'get',
    url: 'https://api.coinbase.com/v2/accounts',
    headers: {
      'Authorization': `Bearer ${accessToken}`,
      'CB-VERSION': '2021-06-23'
    }
  };
 try {
    const response = await axios(config);
    res.send({ response: response?.data })
  } catch (e) {
    console.log("Could not get accounts", e.response.data)
  }
});
We are using the same format as the other calls. We use a config object that includes our user’s token. We pass that config object to axios which calls the Coinbase API. We display everything returned from Coinbase in the browser.
To test this out, start your server. In browser navigate to http://localhost:3000. Connect to Coinbase and authorize the application.
Next enter http://localhost:3000/accounts as the URL in your browser. You should get a response like this:

Filtering Account Data
As you look at the response from Coinbase, you will notice that it provides details on all possible wallets that they support. A user may not have any crypto in these wallets.
We can filter the data to only return accounts that have an actual balance. Update the try-catch block to have this code:
try {
  const response = await axios(config);
  // filter out only accounts that have a balance
  let accounts = response.data.data.filter( item => {
    if (parseFloat(item.balance.amount) > 0 ) {
      return item;
    }
  });
  res.send({ response: accounts })
} catch (e) {
  console.log("Could not get accounts", e.response.data)
}
Test it again now and you will see that it only returns accounts with a positive balance.
Format Account Data in a Table
Currently we are displaying everything returned from Coinbase in the browser. This is not very effective. I would rather display the information in a table.
If you look at the / endpoint, we display a html file with the use of res.render. We display data returned from Coinbase by using res.send. Let’s change that to display an html page with a table of the data.
Create a new file in the views folder called accounts.ejs. Copy/paste the contents of the index.ejs file into the accounts.ejs file.
Delete the
and button in the body tag leaving just the title. Add the following code below the title:
<table>
  <thead>
    <tr>
      <th>Wallet Name</th>
      <th>Currency</th>
      <th>Balance</th>
      <th></th>
    </tr>
  </thead>
  <tbody>
    <% for(var i=0; i< accounts.length; i++){ %>
      <tr>
        <td><%= accounts\[i\].name %></td>
        <td><%= accounts\[i\].currency.name %></td>
        <td><%= accounts\[i\].balance.amount %></td>
        <td><a href='<%= '/transactions/' + accounts\[i\].id %>' class="btn">Get Transactions</a></td>
      </tr>
    <% } %>
  </tbody>
</table>
What this code does is loop through all the accounts and display them in a row in the table.
We just need to pass in the accounts when we display this file. Go back to the index.js file. Replace the res.send line with this:
res.render('accounts', { title: 'Accounts', accounts: accounts });
Styling our Table
Before testing the results, let’s put in some styles so that our table looks good.
Open the style.css file in the public/stylesheets folder. Add the following CSS code:
table {
  color: #333;
  background: white;
  border: 1px solid grey;
  font-size: 12pt;
  border-collapse: collapse;
  margin-bottom: 50px;
}
table thead th,
table tfoot th {
  color: #777;
  background: rgba(0,0,0,.1);
}
table caption {
  padding:.5em;
}
table th,
table td {
  padding: .5em;
  border: 1px solid lightgrey;
}
Testing our Accounts Page
We will follow the same steps we have done before to test the accounts page.
To test this out, start your server. In browser navigate to http://localhost:3000. Connect to Coinbase and authorize the application.
Next enter http://localhost:3000/accounts as the URL in your browser. You should get a response like this:

Display Accounts After Authorizing Account
I am not so keen on displaying raw data from Coinbase when you click on the Connect With Coinbase button. I would much rather display the Accounts page instead. Let’s change our application to do that.
Open the index.js file in the routes directory. In the /callback route we have a res.send entry that displays all the data returned from Coinbase. Let's change that to instead redirect to the /accounts route. Replace the res.send with this line:
res.redirect('/accounts');
Now when you test the application, after authorizing with Coinbase you will see the table with all your account details. This is a much better UI for our users.
Displaying Transactions
Transaction resource represents an event on the account. It can be either negative or positive on amount depending if it credited or debited funds on the account.
Here is the Coinbase API documentation on transactions.
To get transactions you call the /v2/accounts/:account_id/transactions endpoint. You must also have the wallet:transactions:read permissions.
If you go back to the SCOPE variable you will see that we have the wallet:transactions:read permission.
Open the index.js file in the routes directory. Add this code:
router.get('/transactions/:id', async(req, res) => {
  const { id } = req.params;
  const config = {
    method: 'get',
    url: `https://api.coinbase.com/v2/accounts/${id}/transactions`,
    headers: {
     'Authorization': `Bearer ${accessToken}`,
     'CB-VERSION': '2021-06-23'
    }
  };
 try {
    const response = await axios(config);
    res.send({ response: response?.data })
  } catch (e) {
    console.log("Could not get user authentication details", e.response.data)
  }
});
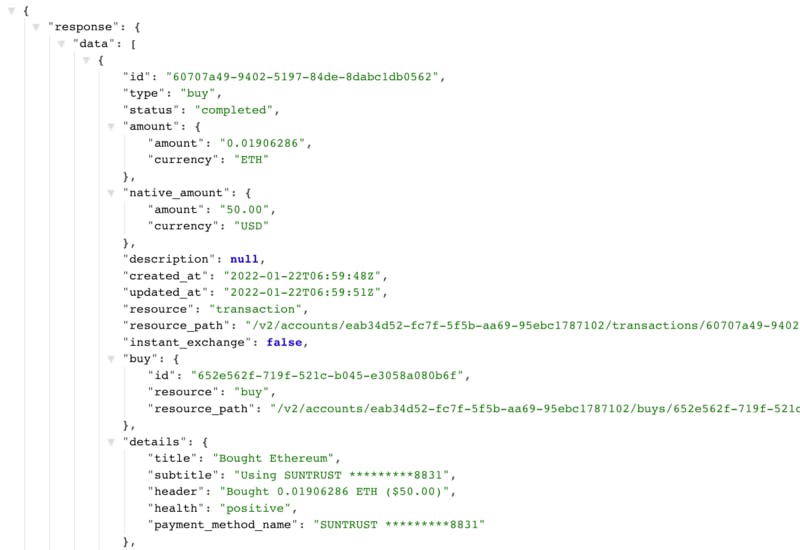
Let’s walk through this code. In order to get transactions you need to have the id of the specific crypto coin. This value is passed in from the accounts table. We’ll destructure the params to get the value of the id.
Next, we create a config object passing in our user’s token. The URL uses the id that was passed in. We then pass the config object to axios to call Coinbase. We display the results that are returned from Coinbase in the browser.
Test it out. You should get a result like this:
Create Transactions Table
We created a table previously to display the user’s accounts. We will copy that table to start building our transactions table.
Create a new file in the views folder called transactions.ejs. Copy/paste contents of the accounts.ejs into this file.
Update the table to be this:
<table>
  <thead>
    <tr>
      <th>Type</th>
      <th># of Crypto</th>
      <th>Amount</th> <th>Date</th>
    </tr>
  </thead>
  <tbody>
    <% for(var i=0; i< transactions.length; i++){ %>
      <tr>
        <td><%= transactions[i].details.title %></td>
        <td><%= transactions[i].amount.amount %></td>
        <td><%= transactions[i].native_amount.amount %></td>
        <td><%= new Intl.DateTimeFormat().format(new Date(transactions[i]).created_at) %></td>
      </tr>
    <% } %>
  </tbody>
</table>
Now that we have our table created, we need to update the endpoint to display this file instead of display the results returned from the Coinbase API.
Open up the index.js file and replace the res.send line with this:
res.render('transactions', {
  title: 'Transactions',
  transactions: response?.data.data
});
Now when you click on the transactions button you should see something like this:

Conclusion
Thanks for reading my article about accessing the Coinbase API. What can you do from here?
There are other Coinbase API calls that will allow you to buy or sell cryptocurrencies. You can go through and add that functionality to the application.
Every time we add a new feature we have to always go back to connecting with Coinbase and authorizing our application. This is because when we try to access the API it fails with an error message that our current token is no longer valid. You can add an endpoint to refresh the user’s token when you receive this error message. This will mean you are not required to continuously reconnect with Coinbase.
You could eventually expand this to display your profit/loss for each cryptocurrency you own by comparing your purchase price with the current price of that crypto.
Thanks for reading.