


Table of contents
- What You Will Learn
- Let's Get Started
- Creating Account on AirTable
- Create a Base on AirTable
- Creating AirTable API Key
- Creating Our Application
- Bulma
- Navigation Bar
- Routing in Nuxt
- Layouts in Bulma
- Hero Component
- Updating the Navigation Bar
- Getting AirTable API
- Teas Page
- Create the Products Page
- Add Title to Both Pages
- Displaying Details
- Create Tea Details
- Adding Details for Products
- Adding Git
- Deploying to Heroku
- Deploy to Netlify
Tell me and I forget
Teach me and I remember
Involve me and I learn
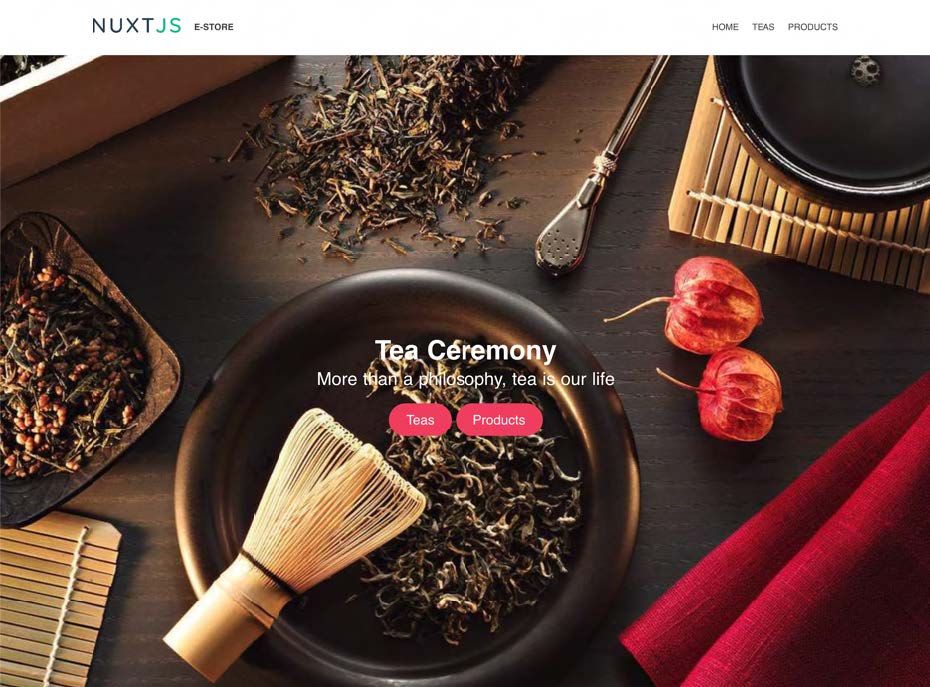
The best way to learn how to code is to actually create something. In this article I will show you step-by-step how to create an eCommerce Website using the Nuxt.js framework. Here is an image of what we will be creating:
What You Will Learn
There are plenty of articles out there that will teach you the basics of creating a simple app using Nuxt.js. I am going to take this a step further and show you how to do things like connecting to an API, use a popular CSS framework called Bulma, and finally how to deploy your completed eCommerce Website to both Heroku and Netlify.
Here is a list of what you will learn with this tutorial:
- Nuxt.js
- Bulma
- Axios
- Vue-simple-markdown
- AirTable
- Accessing an API
- Deploy to Heroku
- Deploy to Netlify
Let's Get Started
In this project we will create an e-Commerce store using Nuxt.js. Nuxt is a progressive framework based on Vue.js to create modern web applications. It is based on Vue.js official libraries (Vue, Vue-Router and Vuex) and powerful development tools (Webpack, Babel and PostCSS). Nuxt's goal is to make web development powerful and performant with a great developer experience in mind.
We will be using AirTable as our database to contain the inventory displayed in our e-Store. AirTable is a spreadsheet-database hybrid, with the features of a database but applied to a spreadsheet.
In the previous two applications we used Vuetify for styling our applications. In this application I am going to introduce you to a new UI framework called Bulma.
Creating Account on AirTable
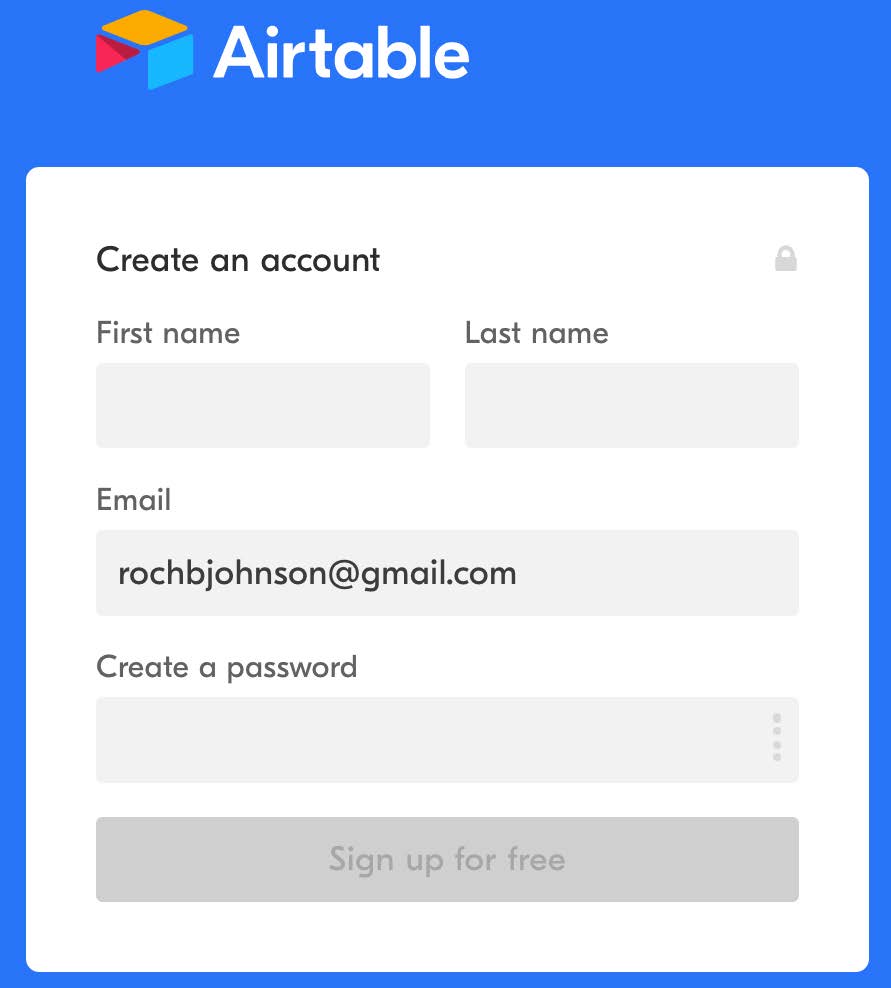
Go to AirTable's website (airtable.com) and put in your email address and click the Get Started button. You will be asked to create an account so complete this form:
Create a Base on AirTable
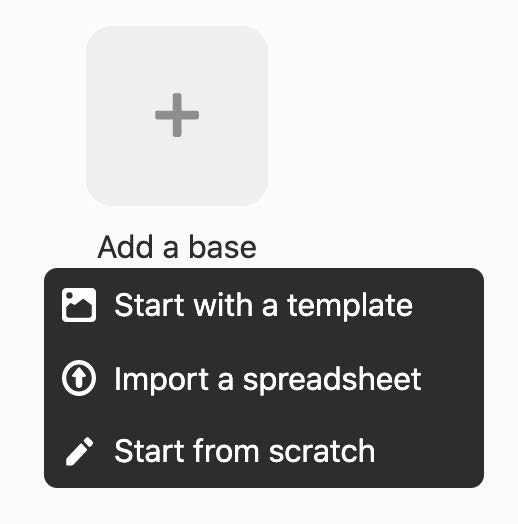
Once you are logged into your AirTable account click the button to create a new base. From the dropdown select Start from scratch.
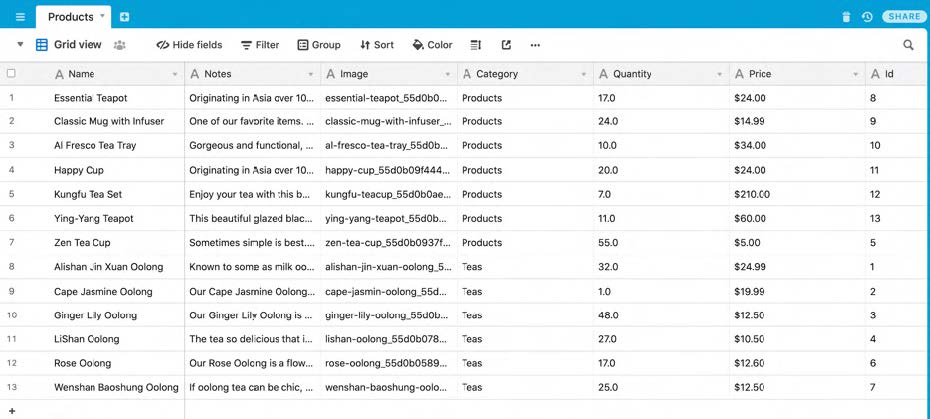
Name your new base Products. You will then see a new table like this:
 Normally you would create a spreadsheet that defines all the fields you need for your products. To make things easier I want you to import a table of products.
Download my table here and save it to your computer.
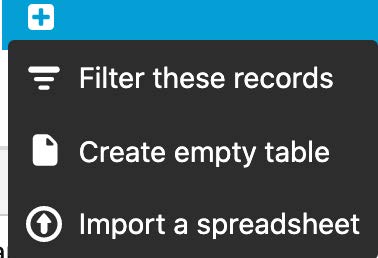
Click on the + icon next to the Table name and select Import a spreadsheet.
Select the file that you just downloaded. You should now have a table that looks like this:
Creating AirTable API Key
Click on the avatar image in the top right corner. From the dropdown menu select Account.
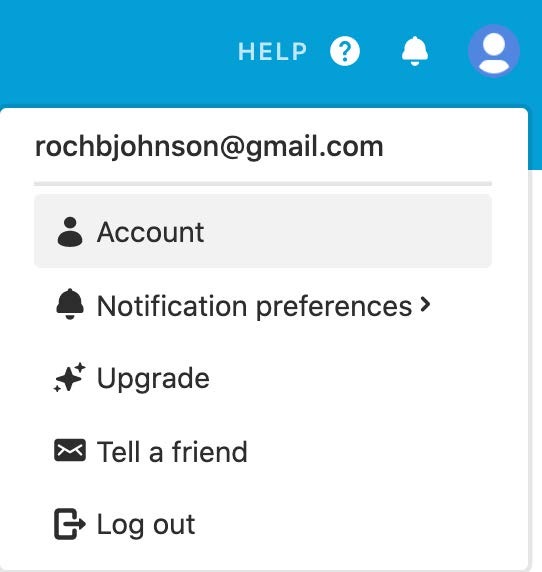
Under the API section there is a button to generate your API key. Click that button.

Creating Our Application
Now we are ready to create our Nuxt eStore. To create the application, enter this comment in your terminal:
npx create-nuxt-app nuxt-estore
You will be prompted with a series of questions. You want to select Axios, Eslint and Prettier, Universal (SSR / SSG), Static (Static/Jamstack hosting), jsconfig.json. Here is what I put for these questions:
 Once this command has finished running, it will give you instructions on how to access the newly created application.
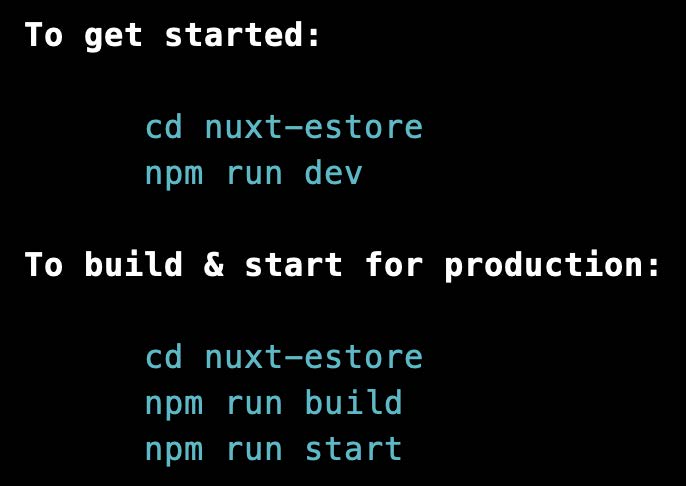
So, let’s follow these instructions and change into the nuxt-estore directory with this command:
cd nuxt-estore
To start our server, you run the command:
npm run dev
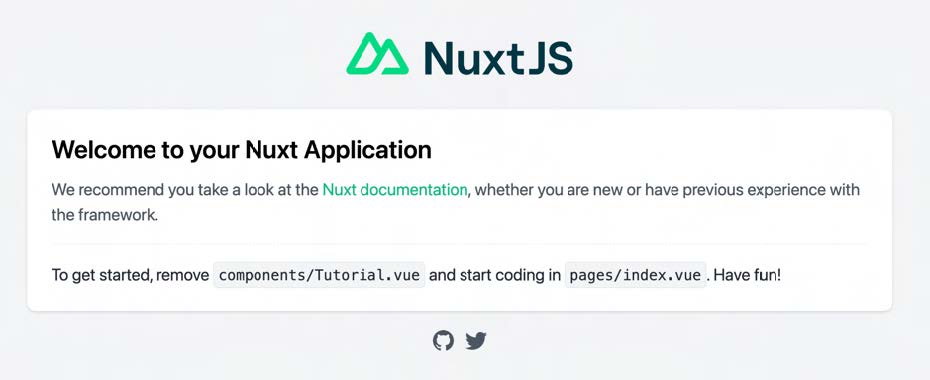
We can test that our server is running by opening our browser and going to this URL:
Bulma
Bulma is a free, open-source CSS framework based on Flexbox and used by more than 200,000 developers. The Bulma documentation is very clear and precise.
We will be using Bulma to style our next-estore application. First, we need to install it with this command:
npm install bulma
Next, we need to add a link to Bulma's CSS file. We will be loading this from a CDN. Open up the nuxt.config.js& file. Find the *link section and add a link to Bulma's CSS file. You link section should look like this:
link: [
  { rel: 'icon', type: 'image/x-icon', href: '/favicon.ico' },
  {
    rel: 'stylesheet',
    type:"text/css",
    href: 'https://cdnjs.cloudflare.com/ajax/libs/bulma/0.9.2/css/bulma.min.css'
   }
]
Go to the Bulma website ink) click on Documentation in the navigation menu. In the left side navigation, click on Components to expand that section. Then click on Navbar. You will see an example of a menu. We will use this to create our navigation.
Navigation Bar
In the components folder create a new file called NavBar.vue. Paste in the sample menu from the Bulma website into the template section.
The template section should look like this:
<template>
  <nav class="navbar" role="navigation" aria-label="main navigation">
    <div class="navbar-brand">
      <a class="navbar-item" href="https://bulma.io">
        <img src="https://bulma.io/images/bulma-logo.png" width="112" height="28">
      </a>

      <a role="button" class="navbar-burger" aria-label="menu" aria-expanded="false" data-target="navbarBasicExample">
        <span aria-hidden="true"></span>
        <span aria-hidden="true"></span>
        <span aria-hidden="true"></span>
      </a>
    </div>

    <div id="navbarBasicExample" class="navbar-menu">
      <div class="navbar-start">
        <a class="navbar-item">
          Home
        </a>

        <a class="navbar-item">
          Documentation
        </a>

        <div class="navbar-item has-dropdown is-hoverable">
          <a class="navbar-link">
            More
          </a>

          <div class="navbar-dropdown">
            <a class="navbar-item">
              About
            </a>
            <a class="navbar-item">
              Jobs
            </a>
            <a class="navbar-item">
              Contact
            </a>
            <hr class="navbar-divider">
            <a class="navbar-item">
              Report an issue
            </a>
          </div>
        </div>
      </div>

      <div class="navbar-end">
        <div class="navbar-item">
          <div class="buttons">
            <a class="button is-primary">
              <strong>Sign up</strong>
            </a>
            <a class="button is-light">
              Log in
            </a>
          </div>
        </div>
      </div>
    </div>
  </nav>
</template>
Routing in Nuxt
Routing is much easier in Nuxt than it is in a Vue application. If you open up the application, you just created you will see there is a folder called pages.
Instead of having to create a running list of routes, all you have to do in Nuxt is to create a file in the pages directory. Any file you create here, Nuxt will automatically create a route that corresponds to the file name. For example, if you add a file called, products.vue then it will automatically create a route /products.
Layouts in Bulma
We want our NavBar component to appear on every page in our next-estore application. Nuxt provides a feature called Layouts that allow you to implement a consistent UI on every page.
Anything that is placed in the default.vue file in the Layouts directory will appear on every page of our website. This is where we would put our Navigation Bar.
Create a new directory in the root of our application called Layouts. Inside that directory create a new file called default.vue.
Open the default.vue file in the layouts folder. Add an import for our NavBar component. If the script section is not present in your file, then add it like this:
<script>
  import NavBar from '../components/NavBar';

  export default {
    components: {
      NavBar
    }
  }
</script>
Then in the template section add the NavBar component between the <div> entries like this:
<template>
  <div>
    <NavBar></NavBar>
  </div>
</template>
Open your application in the browser and you will now see your new navigation bar. BUT we no longer see the default content we were seeing earlier.
We no longer see the default content because we are not seeing the component. We need a way to display the current component in the default.vue file.
Below the NavBar entry in the template add this line:
<Nuxt />
This is the Nuxt equivalent of <router-view> in a Vue.js application. As you navigate between pages, this will display the appropriate page of your website.
Now we see the default content and our NavBar.

For now, we will leave the navigation menu as is and will come back later and update it.
Hero Component
Next, we will create our hero component. Create a new file in the components directory called Hero.vue.
Go back to the Bulma documentation and look at Hero under the Layout menu.
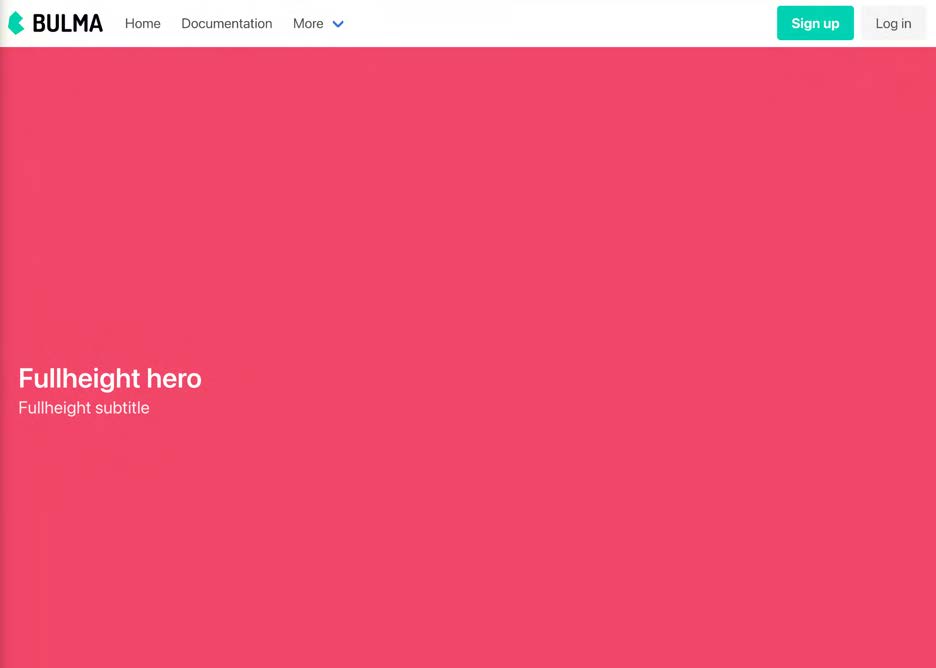
Hero is the name given to the area displayed underneath our Navigation Bar. If you scroll down, you will see the code for a Hero that is full height. Copy that code and put it in the template section of the file like this:
<template>
  <section class="hero is-danger is-fullheight">
    <div class="hero-body">
      <div class="container">
        <h1 class="title">
          Fullheight hero
        </h1>
        <h2 class="subtitle">
          Fullheight subtitle
        </h2>
      </div>
    </div>
  </section>
</template>
Open up the index.vue file in the pages directory. Replace the Tutorial component inside the template section with Hero.
<template>
  <Hero />
</template>
When you view the application in the browser it looks like this:
Let's make some changes to our hero. Open up the hero.vue file in the components directory.
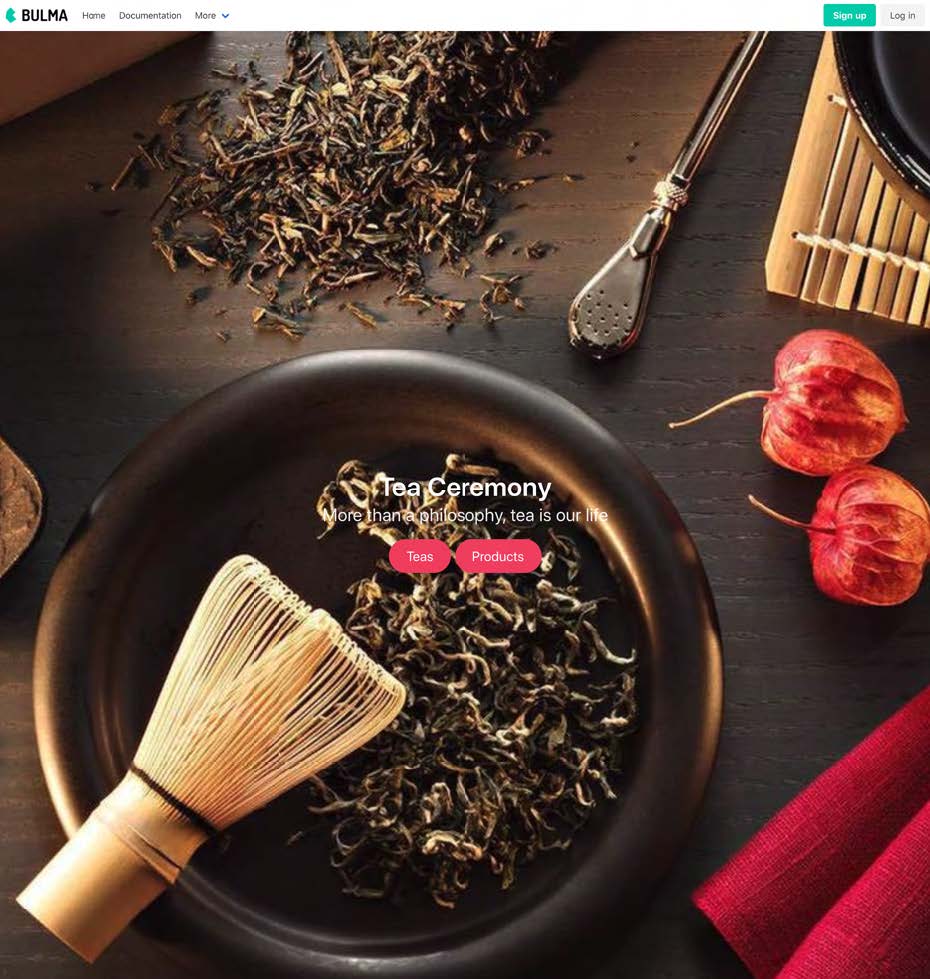
Change the title from Fullheight hero to Tea Ceremony. Change the subtitle from Fullheight subtitle to More than a philosophy, tea is our life.
I would like this text to be centered. There is a div with an empty class above the title. Add the class container and has-text-centered.
<div class="container has-text-centered">
I would like the text to be larger than it is right now. Bulma has sizes that you can add to text. The largest size is the prop value of is-1. Add this class to the title:
<p class="title is-1">
Bulma recommends that the subtitle size be 2 sizes less than the title. Add the class is-3 to the subtitle:
<p class="subtitle is-3">
I want to add a background image to our hero. Go here and download the background image you will be using. Save this image in the assets folder. (Note you may need to create a folder called assets in the root directory of the application if it does not exist.)
In the template section add this image between the section and div tags at the start of the template section. Add the class hero-background to the image. It should look like this:
<img src="../assets/hero-image.jpg" width="100%" alt="hero image" class="hero-background">
Let's add some styling for the background. Add this to your styles:
<style scoped>
.hero-background {
  position: absolute;
  object-fit: cover;
  object-position: center center;
  width: 100%;
  height: 100%;
}
</style>
I want to add 2 buttons below the subtitle. These buttons will allow users to go directly to our teas and our products. Below the p for the subtitle add a div and give it a class of is-centered.
<div class="is-centered">
</div>
Inside the div I want to have two buttons that will appear side by side. I want the buttons to be red in color and have rounded sides. Might as well make them large sized buttons.
Bulma provides many options to stylize a button. Add two button elements with a class of button. The text for the two buttons should be Teas and Products.
<div class="buttons is-centered">
  <button class="button">Teas</button>
  <button class="button">Products</button>
</div>
To add color to the buttons you can add the class is-danger. To make them bigger in size you can add the class is-large
To make the rounded you can add the class is-rounded.
This is what our buttons should look like now.
<div class="buttons is-centered">
  <button class="button is-danger is-large is-rounded">Teas</button>
  <button class="button is-danger is-large is-rounded">Products</button>
</div>
When you click on the buttons, I want it to redirect you to either the teas page or the products page. To handle the navigation, we use the nuxt-link component.
Surround both buttons with a nuxt-link component. To tell it where to go you need to add a prop called **to&&. The teas button should go to "/teas" and the products button should go to "/products".
Here is what out code looks like now:
<div class="is-centered">
  <nuxt-link to="/teas">
    <button class="button is-danger is-large is-rounded">Teas</button>
  </nuxt-link>
  <nuxt-link to="/products">
    <button class="button is-danger is-large is-rounded">Products</button>
  </nuxt-link>
</div>
Now when you open the application in the browser you see our background image with our title text and the two buttons.
Updating the Navigation Bar
We created our Navigation Bar earlier and I said we would come back and change it. Open the NavBar.vue component.
Let's replace the Bulma image with the Nuxt.js image. Change the src for the img tag to be d33wubrfki0l68.cloudfront.net/5b560be9d4ab4..
Also remove the width and height from the img tag. It should look like this:
<img src="https://d33wubrfki0l68.cloudfront.net/5b560be9d4ab4c2aeeff41ee39ee36523dd273ba/29ae6/logos/nuxtjs-typo.svg" >
Right now, when you click on the image it redirects you to the Bulma website. Let's change that so that it redirects you to "/".
<a class="navbar-item" href="/">
  <img src="https://d33wubrfki0l68.cloudfront.net/5b560be9d4ab4c2aeeff41ee39ee36523dd273ba/29ae6/logos/nuxtjs-typo.svg" >
</a>
The left side of the navigation bar has a dropdown with a title of More. Delete it.
The right side of the navigation bar has two buttons. Delete the entire div with a class of navbar-item that contains these two buttons.
The div with the class of navbar-start has entries for Home and Documentation. Move both to be inside the navbar-end. These two menu items should now be on the right side of the screen.
You can now delete the empty div with class of navbar-start
Change the text Documentation to say Teas.
Copy the entire <a> tag that has teas and add a third menu item. Change the text from Teas to Products.
The menu should have three items - Home, Teas and Products. For each <a> tag add a href that points to the page it should load. For home it should be "/". For teas it should be "/teas". For products it should be "/products".
This is what the NavBar template should look like:
  <nav class="navbar" role="navigation" aria-label="main navigation">
    <div class="navbar-brand">
      <a class="navbar-item" href="/">
        <img src="https://d33wubrfki0l68.cloudfront.net/5b560be9d4ab4c2aeeff41ee39ee36523dd273ba/29ae6/logos/nuxtjs-typo.svg" >
      </a>

      <a role="button" class="navbar-burger" aria-label="menu" aria-expanded="false" data-target="navbarBasicExample">
        <span aria-hidden="true"></span>
        <span aria-hidden="true"></span>
        <span aria-hidden="true"></span>
      </a>
    </div>

    <div id="navbarBasicExample" class="navbar-menu">


      <div class="navbar-end">
        <a class="navbar-item" href="/">
          Home
        </a>

        <a class="navbar-item" href="/teas">
          Teas
        </a>

        <a class="navbar-item" href="/products">
          Products
        </a>
      </div>
    </div>
  </nav>
</template>
Getting AirTable API
Go to this url to find the correct API call for your database. Click on the Products base that you have created.
In the Introduction section at the top of page you will be shown the ID of this base. You will need this value later.
In the Authentication section there is an example using query parameters. It should look like this:
curl https://api.airtable.com/v0/YOUR_BASE_ID/Products?api_key=YOUR_API_KEY
We will be using that URL to fetch data for both our Teas and Products pages.
Teas Page
Create a new folder called Teas inside the Pages directory. Inside the Teas folder create a new file called index.vue.
When this page is loaded, we want to call the AirTable API and get a list of all the teas that are in the database and display them to the users. We will use Axios to make the call to the AirTable API.
In the script create a methods section. In that we will have a method called getProducts. This method will make the call to the AirTable API using Axios.
For now, let's make the call and console.log the response.
methods: {
  getProducts() {
    this.$axios.$get(
`https://api.airtable.com/v0/YOUR_BASE_ID/Products`, {
      headers: {
        Authorization:
          'Bearer YOUR_API_KEY'
      }
    })
    .then(response => {
      console.log('response', response)
    })
  }
}
Be sure to put in the ID for your base in the URL and your API key in the Authorization.
We want to call this getProducts method so add a mounted section that calls this method.
mounted() {
  this.getProducts();
},
When you load the Teas page you will see the results of the call to the AirTable API which is an array of records. Each record is an object. Inside that object is a fields object that contains the data for that product.
NOTE: If you get an error message when navigating to the teas page, you may need to stop and restart your server.
This is all the products in the AirTable database. This is not what we want. We want only Teas. AirTable provides a filterByFormula to allow us to filter the results and get only the Teas.
First, create a data section and have a variable called products that has a value of an empty array:
data: () => ({
  products: []
}),
Add the filterByFormula to our API call and tell it to return only those items where the Category field contains Tea. Replace the console.log line with Here is what it should look like:
methods: {
  getProducts() {
    this.$axios.$get(
`https://api.airtable.com/v0/YOUR_BASE_ID/Products?filterByFormula={Category}='Teas'`, {
      headers: {
        Authorization:
          'Bearer YOUR_API_KEY'
      }
    })
    .then(response => {
      this.products = response.records;
    })
  }
}
In the template section create a div with a class of container. Inside that, create a div with a v-for loop that loops through all the products. We will use the products id as the key:
<div class="container">
  <div v-for="product in product" :key="product.id">
  </div>
</div>
To display the products on the page, Bulma provides a card component. A card can have a header, an image and content.
Create a div with a class of card. Inside that, create a div with a class of card-image. Inside that create a figure with the img like this:
<div class="card">
  <div class="card-image">
    <figure class="image is-square">
      <img :src="product.fields.Image[0].url" alt="product.fields.Name">
    </figure>
  </div>
</div>
Right now, if you look at this page in the browser you see the images for all the teas. We will add styling for the page but first let's add all the content we want to display.
Below the div with the class of card-image create a new div with a class of card-content. Inside that create a div with a class of card-header-title and show the name of the product. Repeat this div but show the price of the product:
<div class="card-content">
  <div class="card-header-title">{{ product.fields.Name }}</div>
  <div class="card-header-title">${{ product.fields.Price }}</div>
</div>
Let's add some styling. I want the name and price to be centered. Add the class is-centered to both. I want to change the size of the text displayed so add the class is-size-3 to the name and the class is-size-5 to the price. I want the price to be grey text so add the class has-text-grey to the price. It should look like this:
<div class="card-header-title is-centered is-size-3">
  {{ product.fields.Name }}
</div>
<div class="card-header-title is-centered is-size-5 has-text-grey">
  ${{ product.fields.Price }}
</div>
Right now, each tea is full width. I want to change this to show three products across on the screen. Bulma provides columns to do this. Bulma documentation tells us to create a div with a class of columns and then wrap each product with a div with a class of column. Add this to the template like this:
<div class="container">
  <div class="columns">
    <div v-for="product in products" :key="product.id" class="column">
      <div class="card">
        <div class="card-image">
          <figure class="image is-square">
            <img :src="product.fields.Image[0].url" alt="product.fields.Name">
          </figure>
        </div>
        <div class="card-content">
          <div class="card-header-title is-centered is-size-3">
             {{ product.fields.Name }}
          </div>
          <div class="card-header-title is-centered is-size-5 has-text-grey">
              ${{ product.fields.Price }}
           </div>
        </div>
      </div>
    </div>
  </div>
</div>
If we view our page now in the browser it shows all the products. The problem is they are all displayed on the same line instead of 3 across.
Add the class is-one-third to the div with the class of column. To have the items wrap add the class is-multiline to the divwith the class of columns.
I want to add some styling and it will require writing CSS. The cards on the rows are not all the same height. I also want to add some styling for the image. Add this CSS in the style section:
.card {
  height: 100%;
}
figure {
  border: 20px solid white;
}
Create the Products Page
The products page will be the same as the teas page. The only difference is when filtering the results from the call to the AirTable API we want to get just the products.
Create a new folder in the pages directory called Products. Create a new file in this directory called Products.vue.
Copy the entire contents of the Teas index.vue file into this new file.
Change the name of the component from Teas to Products.
In the getProducts method in the filter change the word Teas to Products.
If you view the products page, you will see all our products.
Add Title to Both Pages
I want to add a title to both pages. Open up the index.vue page in the Teas directory. Below the div with the class of container create a new div that has the text Teas. Add the classes of title, is-size-1, has-text-centered.
<div class="title is-size-1 has-text-centered">Teas</div>
Add the same div to the Products page and change the text to say Products.
Displaying Details
If you click on any of the items, I want to display a new page that shows you the details for that product.
In most applications you have a route like "/teas" that shows all the teas. If you click on a tea, then you are taken to a route like "/teas/:id" where id is the id of the tea you selected.
Nuxt dynamically creates routes for us so you cannot create a route to display a single product. Instead Nuxt handles this by creating a folder inside the pages directory that has the same name of the first route. So, you would create a new folder called teas. Inside that folder you would have a file called index.vue. That file will display items for the route "/teas". This is what we have now.
Also, inside that folder you would have a file with the name of "_id.vue". This file will display the details for the route "/teas/:id". We need to create this file.
In the index.vue file we loop through every tea product and display it using a div with a class of card. Wrap this div inside a nuxt-link component.
We need to add a to prop to the nuxt-link with the route to display the details. Our AirTable database has a field called Id which is an AutoNumber field. That means each record will be assigned a unique number. We will use that in the route. The nuxt-link should look like this:
<nuxt-link :to="`/teas/${product.fields.Id}`">
This will display the _id.vue file.
Do the same for the products page. Wrap it with a nuxt-link that goes to "/products/${product.fields.Id|"
Now that you understand how Nuxt handles this routing let's create the details pages.
Create Tea Details
In the Teas folder create a new file called _id.vue. This page will be displayed when somebody clicks on a tea to get more details.
We will be duplicating a lot of the functionality from our index.vue file. Copy the data, mounted and methods from the index.vue file into this new file.
When this new page is displayed, we can use Nuxt route params to get the id. You can get it with this:
$nuxt.$route.params.id
In the mounted method we call getProducts. Let's update it so that we pass in the id we get from Nuxt route params:
mounted() {
  this.getProducts($nuxt.$route.params.id);
},
Add a parameter to our getProducts method called id.
getProducts(id) {
Change the filterByFormula so that instead of searching by the Category field instead search by the Id field. Instead of hard coding the text 'Teas' let's instead use string interpolation and display the id that is passed into the method.
this.$axios.$get(
    `https://api.airtable.com/v0/<yourKey>/Products?filterByFormula={Id}='${id}'`, {
  headers: {
    Authorization:
    'Bearer <yourKey>'
  }
})
To display the details, I want to divide the screen into two equal length columns. On the left I want to display the image of the product. On the right I want to display the name, description, price, quantity available and a button to add this item to your cart.
In the template section add a div with a class of container. Inside that, create a div with a class of columns. Since I want two equal length columns, create two div with a class of column. Like this:
<template>
    <div class="container">
      <div class="columns">
        <div class="column"></div>
        <div class="column"></div>
      </div>
    </div>
</template>
Inside the first column create an img for the product:
<img :src="products[0].fields.Image[0].url" alt="products[0].fields.Name">
Inside the second column create a div with a class of title to display the name of the product.
Below that, display the price in red text. Create a div with a class of subtitle and has-text-danger and display the price of the product.
Next, I want to display the Notes which contain a description of the product. I will use a npm package called vue-simple-markdown to display the notes.
In the console add the vue-simple-markdown package:
npm install vue-simple-markdown
For Nuxt to know how to use this plugin we need to do some configuration.
Create a folder called plugins in the root directory of our application. Create a new file called VueSimpleMarkdown.js in the plugins folder. Add this code in that file so that Vue knows how to use this plugin:
import Vue from "vue";
import VueSimpleMarkdown from "vue-simple-markdown";
import "vue-simple-markdown/dist/vue-simple-markdown.css";

Vue.use(VueSimpleMarkdown);
Open the nuxt.config.js file in the root directory of your application. Add this to the plugins array:
plugins: [
  '~/plugins/VueSimpleMarkdown'
],
Open the _id.vue file. Add the vue-simple-markdown component and give it a source prop with the Notes from the product like this:
<vue-simple-markdown :source="products[0].fields.Notes"></vue-simple-markdown>
Next, I want to display the available quantity of this product. I want the text to be bold. Add a div with a class of has-text-weight-bold and mt-3 and display the quantity available.
<div class="has-text-weight-bold">Quantity Available: {{ products[0].fields.Quantity }}</div>
The last thing I want to display is a button with the text of buy it now. I want the button to be full width across the column, be red in color, be large and the text displayed in uppercase. Add a button with all this:
<button class="button is-danger is-fullwidth is-uppercase is-large mt-3">buy it now</button>
Now when you view the details of any tea you will see our new details page. But you might get an error. This is because it is trying to display the products before the data is returned from AirTable.
We can easily fix this by only displaying the details when there is a product in the products array. Update the div with class of columns to be:
<div v-if="products.length" class="columns">
Adding Details for Products
Now that we have added the details page for Teas, we need to do the same thing for Products.
Create a new file in the Products folder called _id.vu. Copy the entire contents of the _id.vue file in the teas folder and paste it into this file.
Change the name of the component from TeaDetails to ProductDetails.
Now you will see the details for either teas or products.
Adding Git
In the next step I will show you how to deploy your Vue application to Heroku and Netlify. These two platforms are the more prevalently used hosting systems by developers.
To deploy your application to either one you will need to add git to your application. In the terminal enter this command:
git init
Deploying to Heroku
Heroku is a platform that lets you easily deploy and host your applications. Signing up for an account with Heroku is free. If you do not already have an account with Heroku then you can sign up here.
Once you have created your account, you will need to install the Heroku CLI. This %[devcenter.heroku.com/articles/heroku-cli] for installing on either Mac or Windows computers. To verify your CLI installation, enter this command in your terminal:
heroku --version
You should see heroku/x.y.z in the output.
Heroku uses a Procfile (name the file Procfile with no file extension) that specifies the commands that are executed by the app's dynos. Create this file with this command:
touch Procfile
The Procfile will be very simple, and needs to contain the following line:
web: nuxt start
This will instruct Heroku to run the nuxt start command and tell heroku to direct external HTTP traffic to it.
The last thing we need to do is to have Heroku run the nuxt generate command. Open up the package.json file. In the scripts object add this line:
"heroku-postbuild": "npm run generate"
Next, we want to add all the files that we have created for this application to git. You can do it with this command:
git add .
You can verify that all the files have been added to git by entering this command where you will see all the changes to be committed:
git status
You should see something like this:

Add a commit message like this:
git commit -m "deploy to heroku"
From your terminal you want to login to your Heroku account. You can do that with this command:
heroku login
To deploy our application, we need to create a new application on Heroku. You can do that with this command:
heroku create
First, we want our application to listen on the host 0.0.0.0 and run in production mode. Do this with these commands:
heroku config:set HOST=0.0.0.0
heroku config:set NODE_ENV=production
Finally, push our code to heroku with this command:
git push heroku master
You can now view your application on heroku by entering this command:
heroku open
Deploy to Netlify
Netlify will host static websites. Nuxt allows you to generate a static version of your application which you can deploy without the need of a server. We will use the nuxt generate command to build a static version of our website.
To deploy your application to Netlify, you deploy it from a git repository. I will be using GitHub for this. Go to GitHub and create a new repository.
When you create the new repo GitHub will give you the commands you need to add this repo to git on your application. It should look like this:

Follow these commands to push your code to your new repo on GitHub
You will need to create an account on Netlify if you do not have one already. Creating an account is free. You can go here to create your account.
Login to your Netlify account. Click the button to create a new site from git.

Netlify will ask you to choose a Git provider. I will select GitHub since that is where I created my repo.
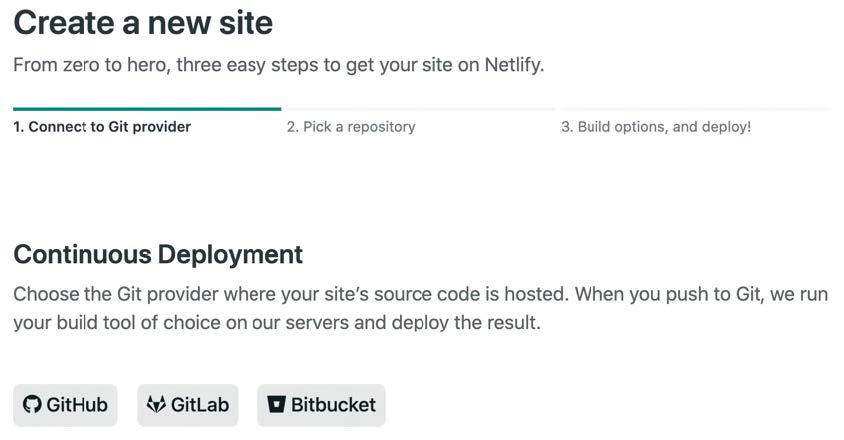
You will be presented with a list of all your repos on GitHub. Select the repo that you created.
Next you will be given a screen to provide the build settings for your application. Make sure you have the following set:
- branch to deploy - master
- build command - npm run generate
- publish directory - dist
Once everything is filled out correctly click the Deploy Site button. Netlify will start the deploy process.
When it is finished you will be shown the url of your application on Netlify. Click on it and you will be able to open your application on Netlify.